Showing posts with label phone rooting. Show all posts

Wednesday, June 12, 2013

How to root the Samsung Galaxy S4 (GT I9500)?

Samsung-Galaxy-S4-with-tree-roots-coming-out-of-it's-back

So, you've just indulged your gadgetry cravings and got yourself a gorgeous new Samsung Galaxy S4. An adorable electronic apparatus, wouldn't you say so? You know find yourself in the peculiar situation of caressing its smooth curves, staring at its splendid Super AMOLED screen and trying to figure out how could someone possibly take full advantage of  its insanely powerful processor. 


But... maybe you demand more! For instance, maybe you want even more processing power from that octa core beast and you decide that you need to overclock it. Maybe TouchWiz ( Samsung property user interface) isn't your cup of tea or maybe you  hate the amount of bloatware that comes with your new Samsung Galaxy S4.  If this is the case, you should take in consideration the fact that there is a way to gain more control over your Samsung Galaxy S4  and in Android terms this can only mean one think: rooting.
Black-Samsung-Galaxy-S4-smartphone-presented-from-different-angles
Samsung Galaxy S4


A reminder:  tampering with your smartphone's firmware, like we gonna do, can have negative consequences. There is a minor risk  that you could end up with an unresponsive handset  and you will void your warranty. You have been warned! On a more calm note, all the modification that you do to your phone, like rooting, can easily be undone and your warranty will be valid once again.

And without further ado, I would like to introduce the steps that you need to take to successfully root your brand new and shiny Samsung Galaxy S4.

1. First things first: pre-requisitions

White-Samsung-Galaxy-S4-smartphone-presented-from-aside

2. Prepare your smartphone

Steps-in-the-menu-for-enabling-USB-debugging-on-Samsung-Galaxy-S4
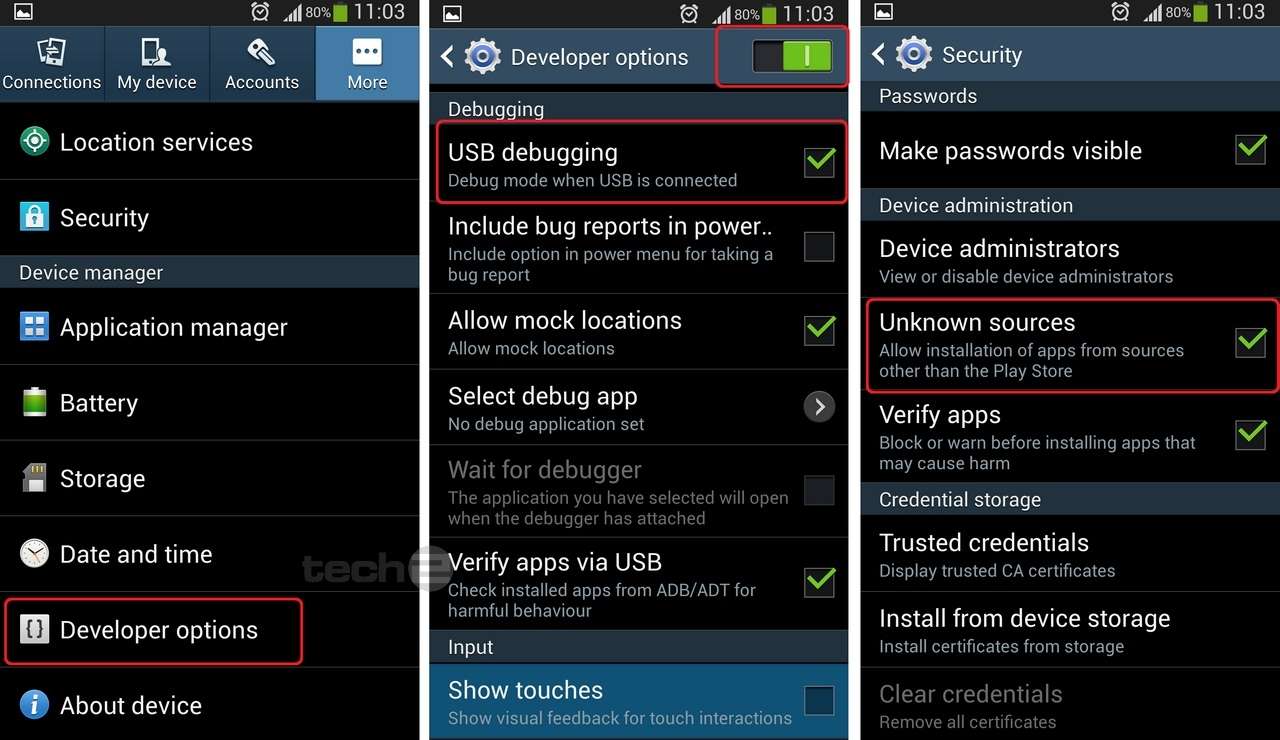
Enabling USB debugging mode on Samsung galaxy S4

  • go in to Settings/More/About device and scroll down until you reach Build Number 
  • now, tap fast&repeatedly the Build Number until it says you are a developer(wow, that was easy!)
  • go back to Settings/Developer Options and turn ON USB Debugging like in the picture above
  • it is safe now to do a full backup of your phone by installing Rom Manager from Play

3. Rooting Samsung Galaxy S4
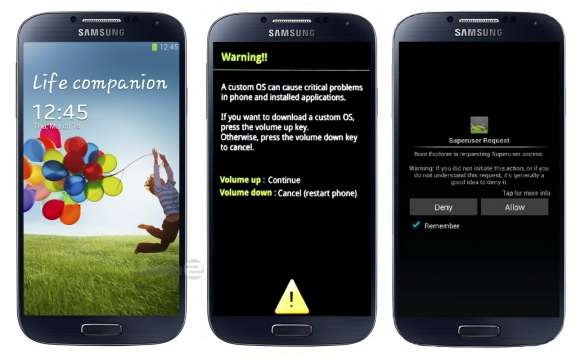
Rooting Samsung Galaxy S4
  • power off your Galaxy S4 and boot the device into Download Mode. To do this you will have to press and hold Volume Down, Home and Power buttons in the same time until the Android robot and a triangle appears on the screen 
  • press the Power button again to continue and be able to enter Download Mode. 
  • once in Download Mode, execute Odin 3.07 on your computer and then connect Galaxy S4 to the PC using USB cable. You have to wait until Odin detects the device.
  • after Odin detected your device, in Odin, click the PDA button and select  CF-Auto-Root-ja3g-ja3gxx-gti9500.zip file.
  • make sure that  Auto Reboot and F.Reset Time checkboxes are selected in Odin. 
  • uncheck the Re-Partition option and  click the Start button in Odin. 
  • the installation process will begin now and it should be over in a few minutes. After the installation process is finished, the smartphone will reboot into Recovery Mode and will automatically install the root package. 
  • and that's it, you are done Sir! You have just successfully rooted your Samsung Galaxy S4

I advice you to wait for the 4.2.2 Jelly Bean updates for your Galaxy S4 that will be provided by Samsung in the next couple of weeks and only than apply the rooting procedures presented above. Why? Because after you have rooted your phone you will not be able to get official Samsung Galaxy S4 updates OTA (over the air). And one final disclaimer:  I am not to be hold responsible if you brick or damage in any way your phone. Root on your own risk  the general guidelines that i have provided are just that, general guidelines.


By Aleman Adrian

Tuesday, June 11, 2013

How to Root your phone?

green-android-robot-with-glasses-standing-near-a-piles-of-books

So, you are a proud owner of new and shinny top of the line Android smartphone. You played with it, it is always in your hands or in your close proximity, you have explored every inch of that gorgeous  screen and abused all of it's settings hoping to find a last hidden option that you somehow missed . But yet, you still find yourself wanting, demanding more! More themes, more settings, more applications, more of everything.  If this is the case than you might be affected by chronic smartphone dependency and you are in need of an urgent treatment. The cure is quick, works like a charm every time and it simply implies applying a bit of "root" to your smartphone.
a-cartoon-representing-a-nerd-pointing-to-an-android-logo-with-root-the-text-says-rooting-for-dummies

Before you attempt to root your precious device, make sure that you have done your part of reading. The most important aspect here is to be well informed and conscientious in following the necessary steps to successfully root your phone. Informing yourself about the basics of rooting can be achieved in the best place on the internet to find rooting guides and custom ROM's and that place is definitely  +XDA Developers Forum. Once you get yourself comfortable with +xda-developers , search for a topic specific to your device and it's almost certain that you will discover a method for rooting that has been tested before and proven to work for everybody.  XDA Developers Forum is the most trustworthy source for rooting guides.The time spent researching the right method to root your device will be also useful in your future technical endeavors.

Rooting preparations

a-real-green-plastic-robot-with-glowing-eyes-and-wires-coming-out-from-it

You start by making sure that your smartphone is fully charged. You will also have to turn USB debugging option on in your phone (you can find this option under settings/developer menu on most phones) Also, most likely, you will be plugging your phone in your computer in order to root it and to do that you need appropriate USB drivers that you will find on the website of your phone manufacturer.

Installing Android SDK on your PC is a must and you may also find that other software is required. So, make sure that you install all the software that you need before proceeding further.

  • One-click rooting

The easiest way of rooting your android smartphone is by far SuperOneClick. This method also supports a large variety of devices and it's the most secure and trouble free way of rooting your phone. Of course, there are other one-click-root solutions out there but we will focus for now on SuperOneClick. Let's get started:

  1. download SuperOneClick
  2. make sure you have the Android SDK running on your PC 
  3. unzip and run SuperOneClick.exe 
  4. make sure your phone is connected to the computer via USB 
  5. check and make sure that your SD card is not mounted 
  6. just go ahead and click “Root” in SuperOneClick on your PC 
  7. the magic unfolds now 
  8. after "Succes" check if you have SuperUser icon on your phone. If you have it than you are OK. 
  9. This is it. You are done! 

See, wasn't that hard after all. You Sir, have just rooted your phone and a world of geeky wonders awaits you: custom ROM's, overclocked processors, thousand of themes, deep customization and tones of new way to control your newly reborned smartphone.

Happy Rooting everybody!
By Aleman Adrian