So, you've just indulged your gadgetry cravings and got yourself a gorgeous new Samsung Galaxy S4. An adorable electronic apparatus, wouldn't you say so? You know find yourself in the peculiar situation of caressing its smooth curves, staring at its splendid Super AMOLED screen and trying to figure out how could someone possibly take full advantage of its insanely powerful processor.
But... maybe you demand more! For instance, maybe you want even more processing power from that octa core beast and you decide that you need to overclock it. Maybe TouchWiz ( Samsung property user interface) isn't your cup of tea or maybe you hate the amount of
bloatware that comes with your new Samsung Galaxy S4. If this is the case, you should take in consideration the fact that there is a way to gain more control over your Samsung Galaxy S4 and in Android terms this can only mean one think: rooting.
 |
| Samsung Galaxy S4 |
A reminder: tampering with your smartphone's firmware, like we gonna do, can have negative consequences. There is a minor risk that you could end up with an unresponsive handset and you will void your warranty. You have been warned! On a more calm note, all the modification that you do to your phone, like rooting, can easily be undone and your warranty will be valid once again.
And without further ado, I would like to introduce the steps that you need to take to successfully root your brand new and shiny Samsung Galaxy S4.
1. First things first: pre-requisitions
2. Prepare your smartphone
 |
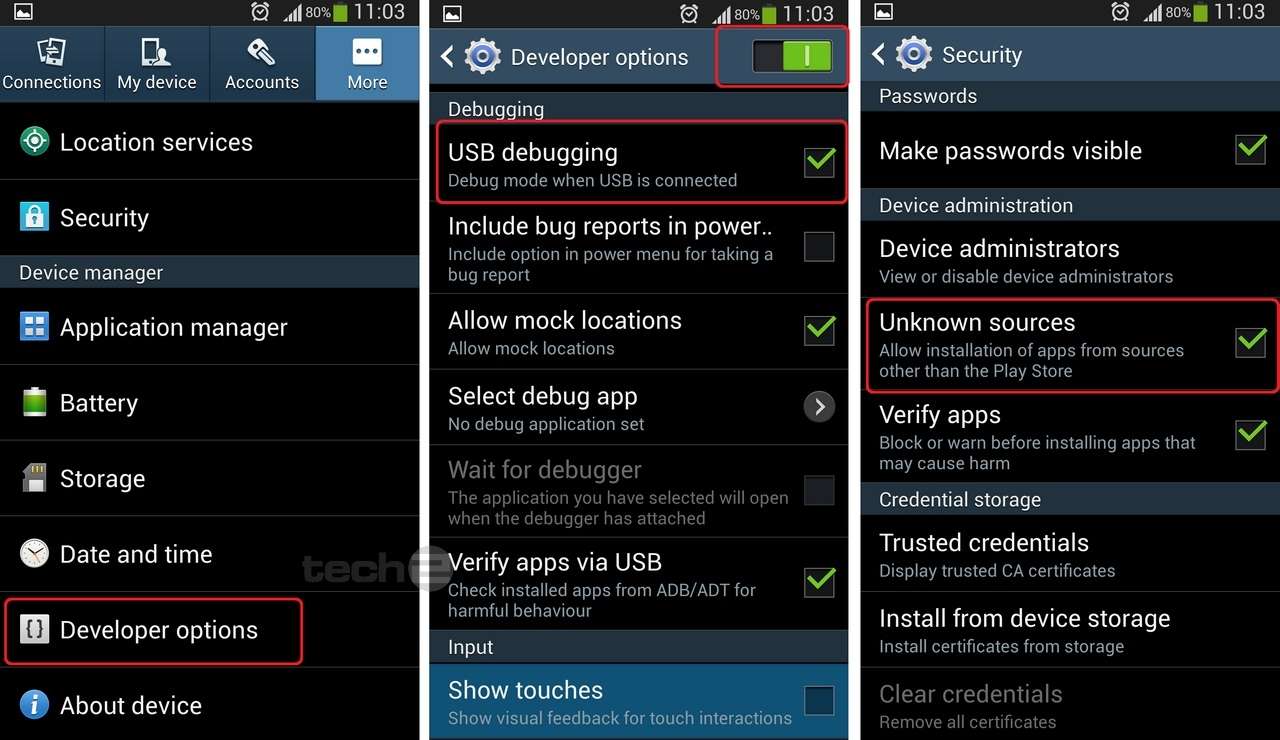
| Enabling USB debugging mode on Samsung galaxy S4 |
- go in to Settings/More/About device and scroll down until you reach Build Number
- now, tap fast&repeatedly the Build Number until it says you are a developer(wow, that was easy!)
- go back to Settings/Developer Options and turn ON USB Debugging like in the picture above
- it is safe now to do a full backup of your phone by installing Rom Manager from Play
3. Rooting Samsung Galaxy S4
 |
| Rooting Samsung Galaxy S4 |
- power off your Galaxy S4 and boot the device into Download Mode. To do this you will have to press and hold Volume Down, Home and Power buttons in the same time until the Android robot and a triangle appears on the screen
- press the Power button again to continue and be able to enter Download Mode.
- once in Download Mode, execute Odin 3.07 on your computer and then connect Galaxy S4 to the PC using USB cable. You have to wait until Odin detects the device.
- after Odin detected your device, in Odin, click the PDA button and select CF-Auto-Root-ja3g-ja3gxx-gti9500.zip file.
- make sure that Auto Reboot and F.Reset Time checkboxes are selected in Odin.
- uncheck the Re-Partition option and click the Start button in Odin.
- the installation process will begin now and it should be over in a few minutes. After the installation process is finished, the smartphone will reboot into Recovery Mode and will automatically install the root package.
- and that's it, you are done Sir! You have just successfully rooted your Samsung Galaxy S4
I advice you to wait for the 4.2.2 Jelly Bean updates for your Galaxy S4 that will be provided by Samsung in the next couple of weeks
and only than apply the rooting procedures presented above. Why? Because after you have rooted your phone you will not be able to get official Samsung Galaxy S4 updates OTA (over the air). And one final disclaimer:
I am not to be hold responsible if you brick or damage in any way your phone. Root on your own risk the general guidelines that i have provided are just that, general guidelines.
By Aleman Adrian


No comments:
Post a Comment